Translate

Dienstag, 16. Februar 2016

Levitation foto's maken


Levitation foto's maken

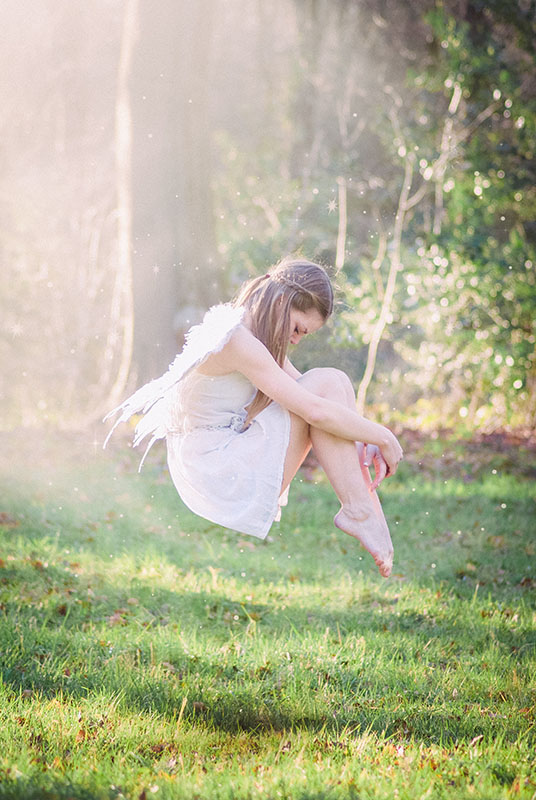
Als beginnend fotograaf zocht ik drie jaar geleden een magische uitdaging, en die vond ik in levitation fotografie: foto's waarin de modellen lijken te zweven.

Een uitdaging was het zeker, want dit soort foto's zijn niet makkelijk om te maken. Als je er echter een beetje handigheid in krijgt kun je een hoop gave dingen doen, en ik laat je zien hoe!
Levitation

Voorbereiding


Levitation foto's vragen iets meer voorbereiding dan een gewone fotoshoot. Het is voor een model best een intensieve klus, en je kan moeilijk improviseren. Om alles zo soepel mogelijk te laten verlopen is het een goed idee om van te voren een schets te maken van je gewenste eindresultaat.

Probeer hierbij al zo gedetailleerd mogelijk te zijn en denk ook aan de houding van de armen/vingers en voeten. Zo kun je straks je model precies vertellen en laten zien wat er moet gebeuren en kun je ook vast rekening houden met de bewerkingen die je later in Photoshop zal moeten uitvoeren.

Het is zeker een leuke extra als je er ook echt een 'verhaal' omheen verzint. Een zwevend model is natuurlijk een leuk plaatje, maar nog leuker is het als de foto ook echt iets vertelt. Je kunt extra aandacht aan locatie, accessoires, make-up en kleding besteden om de foto nog bijzonderder te maken.

Wat heb je nodig?


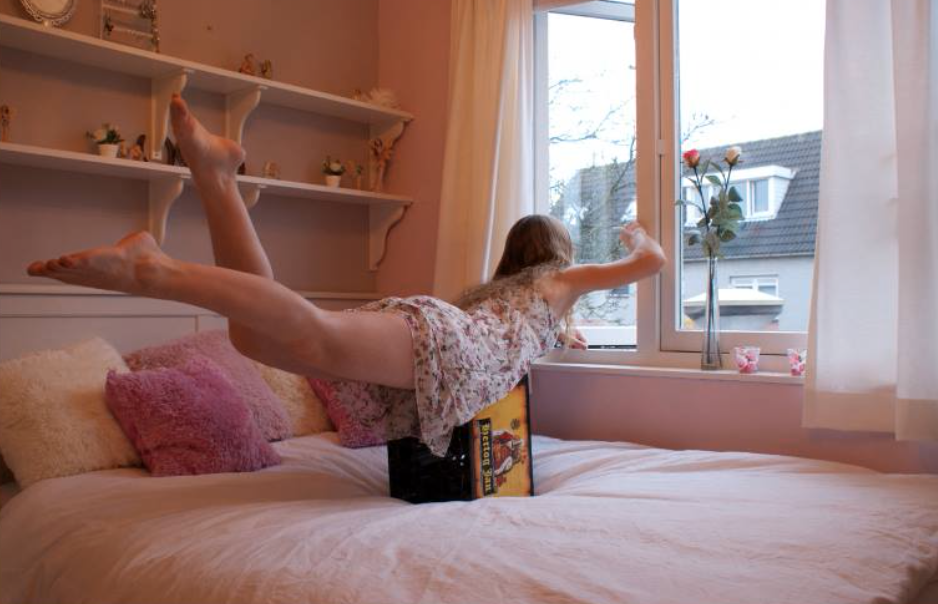
Allereerst natuurlijk een model. Maar daarnaast, een voorwerp om je model te laten zweven. Ik heb veel geprobeerd, en tot nu toe nog niets gevonden wat echt comfortabel is. Belangrijk is dat het een voorwerp is dat tot je knieën of hoger komt, en geen leuningen heeft.

Een stoel zal niet werken, maar een kruk is ideaal. Ook bierkratjes heb ik wel eens gebruikt. Ook een klein tafeltje zou dienst kunnen doen.

Je zult je foto's met een statief schieten, dus zorg dat je die ook bij je hebt.

Je model plaatsen


Het goed plaatsen van je model is het allerbelangrijkst. Om een realistisch resultaat te verkrijgen zijn een aantal dingen belangrijk.

Denk bijvoorbeeld aan de zwaartekracht. Heeft je model een jurkje aan, dan moet dat jurkje wel naar beneden hangen. Zorg dan dat je de stof zoveel mogelijk over de rand van het voorwerp drapeert. Ook de haren moeten echt naar beneden hangen.

Zorg ook dat de handen en voeten vrij zijn, deze mogen nergens op leunen. Dit maakt het voor het model vaak vrij zwaar, afhankelijk van de pose.
Levitation

De foto schieten


Je zult twee foto's gaan schieten op je statief, op precies hetzelfde punt en met dezelfde compositie en instellingen. Hier komt het statief dus om te hoek kijken! Zet je camera in de M stand, zodat de instellingen niet veranderen en de foto's straks precies hetzelfde zijn.

Vervolgens plaats je het model en maak je een foto waarmee je tevreden bent. Vervolgens laat je je camera exact zo staan, en zorg je dat het model en alle accessoires uit beeld verdwijnen. Hierna maak je nog een foto.

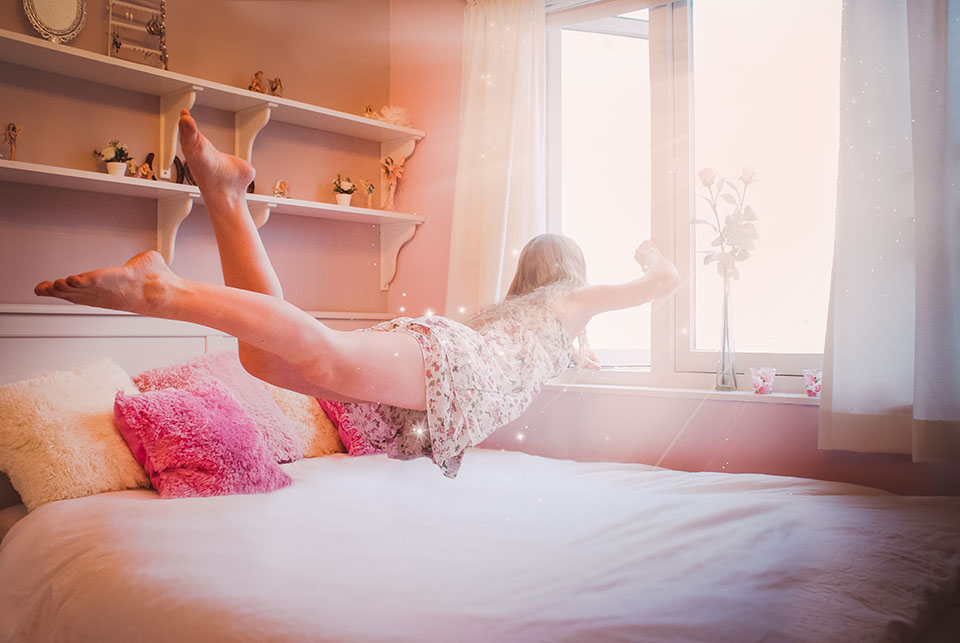
In Photoshop ga je vervolgens deze twee foto's over elkaar plaatsen, zodat je het stoeltje/krat/voorwerp waar het model op geplaatst is kunt weggummen. En tada, je model lijkt te zweven!

Maak het liefst meerdere foto's, als je model het goed volhoudt, en plaats af en toe de kleding en het haar wat anders. Als je er dan later achterkomt dat op je mooiste foto de kleding niet mooi naar beneden hangt, dan kun je kleding van een andere foto gebruiken in Photoshop.

Hou ook rekening met je bewerking, als je die achteraf nog wil toevoegen. Let op de lichtinval, de achtergrond en ruimte waar je eventueel iets wilt toevoegen.

Je hebt je foto nu geschoten! Je hebt al het materiaal bij elkaar om een mooi, magisch eindresultaat in elkaar te zetten.
Levitation

Sonntag, 14. Februar 2016

48 hours to stand up to Saudi

Dear friends,

They bomb schools, hospitals, even wedding parties. What Saudi Arabia is doing in Yemen is disgusting -- and they’re doing it with weapons they buy from Europe, the US, and Canada. But in 48 hours we can do the unthinkable -- win a landmark decision that could stem the flow of weapons to the Saudis. The European Parliament is two days away from having a proposed EU-wide arms embargo put to a vote -- but under heavy Saudi lobbying, some politicians are wavering.

Now more than ever, these leaders need to see that people from every corner of the Earth are looking to them to stand up and say “NO” to Saudi Arabia and their atrocities. Sign the urgent petition calling for an arms embargo -- let's show the EU champions overwhelming public support:


https://secure.avaaz.org/en/saudi_arms_deal_de/?bIiqNab&v=72803&cl=9488983005

This is how we can help end wars -- by cutting off the supplies that fuel them. Calling for an embargo would have been unthinkable a few years ago because of western governments’ tight relationship with the regime, but this total disregard for human rights has made it impossible for them to look the other way. Europe could now vote for an embargo -- they just need to feel the public is watching and cares.  
A Saudi bomb killed over 200 family members at a wedding party, and a recent leaked UN report found that fleeing civilians were shot by helicopters -- that’s an image hard to shake. Saudi Arabia started these attacks last year as part of a proxy war with Iran. Both sides are guilty of appalling violence. And while this vote won’t end the carnage overnight, it will send a clear political signal that the EU won’t trade weapons with a regime that indiscriminately bombs civilians. From there we can begin to stop all governments from flooding this war with weapons.
The regime is not the only one benefiting from these deals. European arms dealers are making billions of dollars from the bloodshed in Yemen! If we don’t raise our voices these billionaires and Saudi Arabia will lobby to keep this horrific war going.  
Wael*, an Avaaz member who’s survived daily airstrikes in Yemen, says that “history will remember those helping to bring peace.” Let’s come together now for Wael, his family, and millions of others. Add your name -- we have just days to help stop weapon sales to Saudi -- then tell everyone:   


https://secure.avaaz.org/en/saudi_arms_deal_de/?bIiqNab&v=72803&cl=9488983005

What makes our community special is that we feel connections between each other and come together in massive numbers to bring change to issues that would otherwise be silenced. Let us come together now and do what we do best to help save the millions of Yemenis whose lives are on the line.

With hope,
Danny, Rewan, Alice, Mohammad, Alex, Antonia, Emma and the entire Avaaz team

 *To protect his identity, Wael’s name has been changed.

More information

UN report into Saudi-led strikes in Yemen raises questions over UK role (The Guardian)
http://www.theguardian.com/world/2016/jan/27/un-report-into-saudi-led-strikes-in-yemen-raises-questi...

Yemen conflict: Saudi-led coalition targeting civilians, UN says (BBC)
http://www.bbc.com/news/world-middle-east-35423282
EU to probe Saudi arms trade (The National)
http://www.thenational.scot/news/eu-to-probe-saudi-arms-trade.13087
Saudi Arabia becomes world's biggest arms importer (The Guardian)
http://www.theguardian.com/world/2015/mar/09/saudi-arabia-becomes-worlds-biggest-arms-importer


Avaaz.org is a 42-million-person global campaign network
that works to ensure that the views and values of the world's people shape global decision-making. ("Avaaz" means "voice" or "song" in many languages.) Avaaz members live in every nation of the world; our team is spread across 18 countries on 6 continents and operates in 17 languages. Learn about some of Avaaz's biggest campaigns here, or follow us on Facebook or Twitter.

Samstag, 13. Februar 2016

Moving Pictures 35th Anniversary

MOVING PICTURES 35th ANNIVERSARY

A modern-day warrior
Mean mean stride
Today’s Tom Sawyer
Mean mean pride
In the fall of 1980, the band recorded in Le Studio in Morin Heights, Quebec.
On February 12, 1981, the band’s highest selling album was released – MOVING PICTURES.
The iconic album included perennial radio favourites – Tom Sawyer, Limelight, Red Barchetta as well as the instrumental nod to their hometown, YYZ. It also featured the 11 minute song The Camera Eye, Witch Hunt and Vital Signs.
The album went on to debut #3 on Billboard, sell over 4 million copies and have Rolling Stone declare it one of the 1001 Albums You Must Hear Before You Die.
To add to it, the Moving Pictures album cover by longtime art director Hugh Syme, was a visual pun on the title and played up a triple entendre. The first meaning is represented by the movers physically carrying pictures; the second by the people watching them who are emotionally moved by the pictures; and the third meaning is shown on the back cover, where the entire scene is revealed to be a set for a motion picture of the whole scene. You can learn more about how this album cover art came to be in the 272 page coffee table book that delves into the 40 year relationship with Rush and their longtime artist and illustrator Hugh Syme. The ART OF RUSH book is on sale now at Rush Backstage.

Watch the full version of RED BARCHETTA from R40 LIVE

R40 LIVE: Red Barchetta
To commemorate this anniversary, Rush Backstage is offering a limited edition signed & framed photo set from the Moving Pictures era:

RUSH Moving Pictures Signed and Framed Limited Edition Photo Set

  • Pre-order now, ship date April 15th, 2016
  • Limited to 100 sets, the Moving Pictures Photo Set contains three iconic photographs taken during the Moving Pictures Tour by renowned rock photographer Philip Kamen.
  • Printed on high-quality photographic paper, each photo has been hand numbered and then signed by the respective band member, and every frame comes with a designated Certificate of Authenticity indicating both the photo and its number in the collection.
  • Note that each piece will have a matching number (e.g. 3/50) to the other two in the set.
  • Frames are approximately 17" x 17" (43 cm x 43 cm) and are made of molded plastic with glass.
  • Pre-order @ Rush Backstage

Donnerstag, 11. Februar 2016

Hoe maak je een goed zelfportret?

Marit Hilarius

Hoe maak je een goed zelfportret?

maandag 8 februari 2016, 16:16 door | 3913x gelezen | 4 reacties Het is als fotograaf ontzettend leuk om eens zelf voor de camera te gaan staan. En dan niet zomaar een camera, maar die van jezelf! Je vervult zo twee rollen tegelijk, die van fotograaf én model.

Op deze manier leer je ontzettend veel over beiden kanten en kun je allerlei concepten uitwerken die je niet aandurft/wil doen met een echt model. Het is echter best wel een lastig klusje, want hoe krijg je jezelf er net zo goed op als je modellen?

Wat heb je nodig?


Een idee of een plan
Het is handig als je van te voren weet wat je wil gaan doen, en wat je wil vertellen met je foto's. Met een model kun je vaak wel 'ergens' beginnen, en in de loop van de shoot volgen meer ideeën. Maar nu ben je in je eentje, en het telkens checken van alle foto's is veel lastiger en kost meer tijd.

Besteed wat tijd aan het maken van een moodboard, of zoek gewoon wat inspiratie plaatjes die je mee kunt nemen voor als je het even niet meer weet.

Een camera
Logisch natuurlijk, je hebt een camera nodig. Eigenlijk kun je met elke camera zelfportretten maken!
Sommige camera's maken het je wel wat makkelijker.

Zo heb je camera's met klapschermpjes. Deze kun je omklappen en op liveview zetten, waardoor je jezelf kunt zien. Dit werkt ontzettend fijn, omdat je meteen poses kunt uitproberen en bekijken hoe de foto eruit komt te zien. Ook kun je zo zien of je goed in beeld staat en of alles scherp is.
Zelfportret1

Je hebt ook op steeds meer camera's een WiFi functie zitten. Je kunt op je telefoon dan een app downloaden en contact maken met je camera. Vervolgens kun je op je telefoon de instellingen aanpassen, het beeld zien, foto's maken, en foto's bekijken. Werkt echt super fijn!

Statief
Een statief is een must voor zelfportretten. Hier kun je je camera opzetten en alle kanten op draaien. Heb je geen statief, kun je vaak wel iets verzinnen door een stapel boeken of krukjes en tafeltjes te gebruiken.

Eventueel een afstandsbediening
Heeft je camera geen WiFi functie, dan is een afstandsbediening een fijne tool. Je kunt deze al voor amper 10 euro op eBay bestellen.

Het fotograferen


Je kunt je zelfportretten op twee manieren maken. Handmatig alles instellen, of met een afstandsbediening of WiFi werken.

Handmatig
Deze optie is niet de fijnste, maar wel noodzakelijk als je geen WiFi op je camera hebt of beschikt over een afstandsbediening.

Het handmatige instellen is best een uitdaging. Hierbij heb je een proefmodel nodig dat ongeveer net zo groot is als jij. Je kunt hier bijvoorbeeld een bezem voor gebruiken, of een stapel boeken op een tafel, eigenlijk kan alles. Deze zet je op de plek waar jij straks wil gaan zitten of staan en daarop stel je scherp.

Vervolgens haal je alle spullen opzij maar onthoud je goed waar die spullen stonden. Markeer de plek eventueel. Zet daarna je de zelfontspanner op 10 seconden en je klikt op de knop. Dan is het een kwestie van een sprintje trekken, een mooie pose aannemen, jezelf weer even fatsoeneren, en dat nog twintig keer voor je een mooi gelukt zelfportret hebt.
Zelfportret2

Op deze manier is het best mogelijk zelfportretten te maken, maar zoals je misschien al merkt, het is niet de makkelijkste manier. Je bent vaak te laat, of je zit toch net een paar centimeter opzij waardoor je niet meer helemaal scherp bent.

Afstandsbediening
Werken met een afstandsbediening is een stuk makkelijker. Je kunt al voor minder dan 10 euro een afstandsbediening kopen op websites als eBay. Ondanks de lage prijs en de vrij lage kwaliteit van de afstandsbediening werken deze perfect!

Als je je afstandsbediening gaat gebruiken moet je je camera ook op zelfontspanner zetten. Op de meeste camera's kun je zien dat er naast een van de opties een kleine afstandsbediening staat in het icoontje. Bij mijn camera is dat bij de 10 seconde optie. Selecteer deze optie als je met de afstandsbediening wilt werken. Meer hoef je niet te doen!

Vervolgens zet je je camera op automatisch scherpstellen, en loop je naar je plek. Daar kun je dan kiezen of je meteen de foto maakt bij het klikken, of nog 2 seconde wacht. Ik raad je aan om nog 2 seconde te wachten zodat je nog tijd hebt om de afstandsbediening te verbergen.

Zorg dat je in je gewenste pose staat, klik op de knop zodat de camera scherpstelt en gaat aftellen, en verberg de afstandsbediening. Op het moment dat de foto wordt gemaakt sta jij in je gewenste positie en is die afstandsbediening nergens meer te bekennen!

Het maken van een zelfportret is eigenlijk niet anders dan bij een fotoshoot met modellen. Het enige verschil is dat jij nu zelf het model bent.
Zelfportret3

WiFi
Met de WiFi functie is er helemaal geen kunst meer aan. Je zet de WiFi van je camera aan, en vervolgens verbind je je telefoon met je camera. Zorg dat je de app hebt die bij jou camera hoort, hier kun je meer over lezen in de handleiding van je camera.

Vervolgens kun je op je telefoon alle gewenste instellingen veranderen en aanpassen, en zelfs met liveview werken.

De foto


Je kunt met zelfportretten echt alle kanten op. Je hoofd hoeft er niet eens op te staan, als er maar een deel van jezelf op staat is het al een zelfportret. Zo kun je ook eens met je rug naar de camera gaan staan, of een heel ander standpunt proberen. Het voordeel is dat je de gekste dingen kunt doen zonder dat iemand je vreemd aankijkt omdat je wel hele rare dingen vraagt.
Zelfportret

Lukt het idee wat je hebt uitgewerkt echt niet, neem dan iemand mee. Zo wilde ik in Zuid-Afrika een foto van mijzelf onder de sterrenhemel, maar daarvoor moest ik dan wel even 50 meter over glibberige rotsen afleggen in 10 seconde.

De afstandsbediening werkte niet van die afstand. Ik heb mijn vader achter de camera gezet en hem de knop in laten drukken. Sommige mensen zijn van mening dat het dan geen zelfportret meer is, maar zo zie ik het niet. De persoon die de knop indrukt vervangt eigenlijk alleen de afstandsbediening.

Het belangrijkst bij zelfportretten is eigenlijk; experimenteren. Probeer van alles, wees niet bang, neem risico's. Doe dingen waarvan je geen idee hebt hoe je het voor elkaar gaat krijgen. Ga uitdagingen aan en probeer gewoon van alles!

Marit Hilarius

Over de auteur

Marit Hilarius is een fotografe die gespecialiseerd is in geavanceerde Photoshop bewerkingen. Ze heeft de basisopleiding van de FotoAcademie in Amsterdam afgerond. Haar stijl kenmerkt zich door de sprookjesachtige sfeer die ze in haar foto's creëert.

Montag, 8. Februar 2016

How to Photograph Wildlife in Low Light

How to Photograph Wildlife in Low Light

As a wildlife photographer, you will be well aware of the fact that most animals we wish to take photos of come out at dawn or dusk. This is also the time of day that the least light is available. If you’re watching wildlife in a woodland area, then the available light is further decreased due to the canopy.
When light is very low, it is all about making the best of a “bad” situation. Usually, you’ll have to compromise something to achieve a properly exposed image. Here are some things to think about in such a situation.

Aperture

Shoot with as wide an aperture as you can, so to let in as much light as possible. The best telephoto lenses will go to f/2.8, letting in a greater amount of light and making your life a lot easier in dark conditions. However, not everyone has access to such equipment and instead has to cope with the limitations of budget telephoto lenses. You may find that your lens only stops down to f/5.6 or higher. With this reduced amount of light reaching the sensor, you need to use other methods to brighten your photos.

ISO Speeds

The ISO speed you choose is very important for low light photography. Don’t be afraid of high ISO speeds and the digital noise it may bring into your photos. Make sure you know the ISO capabilities of your camera beforehand, as then you can have a good idea of how far you can push your equipment. Some cameras perform badly at higher ISOs, resulting in very noisy images, while others can perform much better. This is a case of you get what you pay for – cameras with better sensors will produce less noise at a given ISO speed.
If you keep your ISO value low, you will probably end up with a slow shutter speed. The result could well be a blurred image, and that is no use. It is better to be brave, pump up the ISO and cope with some noise – at least you then have a usable photograph.
Further Reading: “Choosing the Optimum ISO Speed
Remember, even if your photo is noisy from using this technique, you can reduce the noise to some degree in the post processing stage. Have a read of How to Reduce Noise in Lightroom to learn about this.
squirrel high speed
Some cameras perform very well at higher ISO speeds. This image was taken at ISO 10,000 using a Nikon D4.

Shutter Speeds

How steady can you hold your camera? Is your subject sitting still? Does your lens have vibration reduction? These are all questions you should be asking yourself if you are faced with a low light situation. If you have one to hand, then use a tripod. This reduces camera shake, allowing for slower shutter speeds to be used. Equally, vibration reduction that comes with many lenses nowadays can help to stabilise shots at slower speeds (although sometimes this can be detrimental if used as well as a tripod).
If your options are really limited, and if the animal you’re photographing is not moving very much, then you can afford to use a much slower shutter speed. I have, in the past, taken images at speeds of just 1/60th of a second or less when the light was very low. But it is a good idea to take a burst of frames when shooting at slow speeds like this, as you are then much more likely to have one that is sharp.
The photo below was taken early on in my career with very limited equipment. Light was in short supply as I was stalking deer early in the morning and the sun wasn’t fully up. At the time I was using a Nikon D80 and took this photo at ISO 400; even then it was pushing the limits. Consequently, I was forced to push the shutter speed down to 1/100th of a second whilst using it handheld. Even so, I got a usable image from my efforts.
wildlife in low light
This next photo was actually shot at 1/80th of a second at an aperture of f/8 and ISO 400. The light clearly wasn’t particularly low on this occasion, but I’m showing you this photo to illustrate the fact that very slow speeds can still be perfectly sharp.
how to photograph wildlife in low light
If you spend a lot of time taking photos in much brighter conditions, you may be used to using very quick shutter speeds. This is not always necessary, especially if you aren’t shooting an action-packed sequence. Just because you aren’t shooting at 1/1000th of a second or more, it doesn’t necessarily mean your images won’t be sharp at slower speeds.

Zoom Lenses

If you are using a zoom lens with a variable aperture range, your maximum aperture is widest when fully zoomed out. If this describes your lens, then consider zooming out a little and widening the aperture to give yourself a little bit more light. You can then crop in again when editing your photo afterwards.

Take Lots of Photos

Once you’ve optimised your settings as best you can, make sure that you hold down the shutter and utilise your camera’s burst mode each time you take a shot. By taking more images, this increases your chances of getting a sharp photo.

Don’t Underexpose Your Photos

If possible, be sure not to underexpose your photos too much. This will only mean that you end up pulling the exposure slider up during post processing to compensate, and combined with an already high ISO speed you’ll introduce even more noise to your photo. When conditions are very bad, you’re going to need to be bold and take a risk with your settings. But underexposing a photo in the field could ultimately scupper your results during post production.

Be Realistic About Your Expectations

Sometimes you just can’t get enough light, even with the best of equipment. Be realistic about what you can expect and understand that there are times when you might not be able to do anything about the poor light conditions.
If you’re finding the limitations of your camera and its ISO capabilities a real problem, then an upgrade can make all the difference. Take a read of our article 3 Telltale Signs You Should Upgrade Your Camera Equipment.

Finding my way (in photography)


Aren't you amazed (like me) about how much progression techonolocy makes? Not so long ago we were having the amazing capacatiy of a floppy disk, what now is not even large enough for a photo to save upon.
Flatscreen tv's are not enough, they should be curved, have 3D and are at least as big as the wall.

Two years ago I started my hobby, photography, and I do like it very much. It gives relaxation,and as a side effect there are so many categories in what you can make photography.
From photographing the galaxy until a spider leg, for everything is a lense. And, different as before, nowadays all that is packed in one camera as well.

People are exited about the light weight camera, that can make macros as well as telezoom pictures, wide angle and night, and so more. And sooner or later comes a point that I compare my pictures with those of them, and, apart from the amazing feeling of what all is possible, I start thinking about my own photography.
Do I really need to photograph the eyes of a spider, sitting there with a macro lense, backlight flashes and and and? The result can be amazing, yes! As well from wildlife, animals, birds, that are so much easier tocatch with a 600 mm tele lense as with a 250 mm.

At all of it is a price ticket, and as well a skill limit. I realize more and more that I like to 'sniff' at that kind of pictures, but that what I really love is nearer by.
I love to watch people in the street. I love to see faces, emotions, things that others walk by and that we see all day. Or don't see.

I thnk I will concentrate a bit more at street photography. I shall need to dare to simply take the pictures. A skill that is worth to develop and what is in reach. It will not make me a less good photographer, but rather a more specialized one.

So, Hans,go at the street, picture what you see.
Be unique. Be yourslef!
Take the challenge to see and show what others oversee. Leave the spies and insects to others, ok, sniff on it, when you like, but concentrate on where it is about for you. :-)  Open 'the eye'  again :-). PaP.. Poetry and Pictures.  :-) People and Paragrphs.